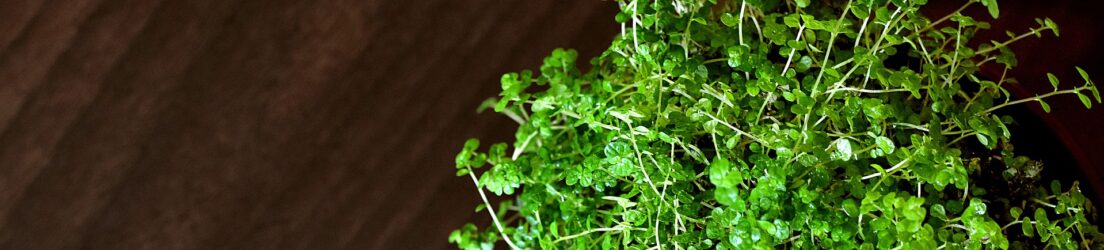
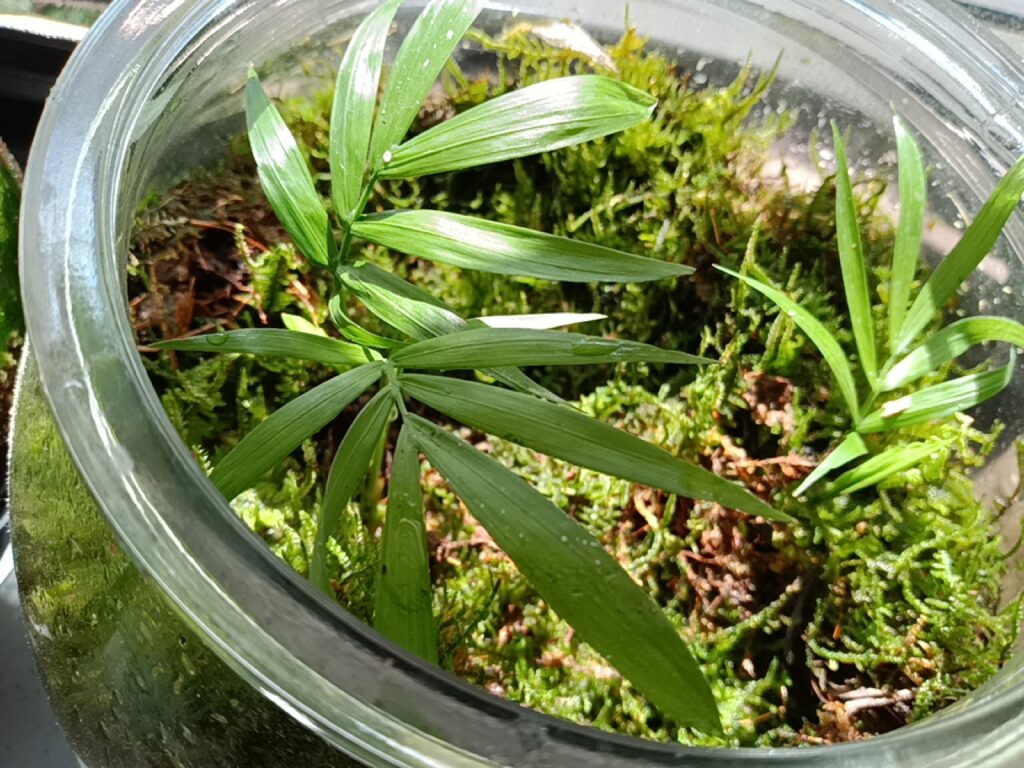
There is one particular plant that I’ve had for some time, and it’s been multiplying to the point, where I can’t keep them as I would like to. Thanks to keeping them in “The Tank”, they’ve been able to grow in abundance, and I’ve also watched several things occur during its growth. Because of the high humid environment inside of, “The Tank”, it can cause some plants to develop air roots, and grow quite nicely. This particular plant that I saw this in, grows quite fast. It’s so common to see this, in this particular species, it’s been given the nickname, “the inch plant”, because before you know it, it grows an inch from the last time you saw it. Its standard designation is tradescantia, and when it grows, it grows and it grows tall and fast.
I’ve not only been able to grow the initial plants, which were around three in the pot, they grew tall, to the point where I had to cut and propagate them in other areas of, “The Tank”. It didn’t take long for the tradescantia to root in the soil and then grow tall very fast. It’s just wild to see this. It took me some time to identify this one, because I just couldn’t figure out what to look for. It’s a good thing I am a recurring customer to the place where I initially bought this. Along with the parlor palms, and one red plant that I did buy from them the same time (3 for $10 at the time), it was a sight to see them grow the way that they did.
It was only a matter of time, before I had to remove the tradescantia, or a good set of them, from, “The Tank”. There maybe one or two propagations still in there, but I may remove those soon, because they are beginning to reach for the stars as well. Only difference, this one is also tangled between other plants, and even bending between those plants.
The red plant that was with those previously named, is nicknamed the bloodleaf plant, but is designation is also a nickname of sorts, Juba’s bush. This didn’t grow as fast in, “The Tank”, but it did grow, and eventually when it did start to grow, I also had to cut and propagate, like many other plants around them. Although, for one set, I’m starting to see some upward leaf curling, which isn’t a good sign. Hopefully I can remedy this, or replace the plant, with a recently rooted propagation.
THIS JUST IN: I have moved this particular plant, and placed it in an empty terrarium, with only peat moss and water, and I’m starting to see it improve. Also, I didn’t see the leaves change, so I did cut them off, so that it will begin growing new leaves. Some air roots are developing, which also shows that things are a little better for it.
It took some time for me to figure out what these were called. This way, if I needed to replace them, with a new purchase, then I would know what to ask for. I can’t say I would do so with the “inch plant”, because it grows almost like a weed, and it can propagate just as easily.
As for the parlor palms, it took some time, but once they begin to adapt inside of, “The Tank”, it was only a matter of time before seeing these plants begin to grow and display new growth. The shoots open up at the top, and eventually spread out; and with enough humidity and water in there, those leaves and the original plants increased in size. Not necessarily comparable to the “inch plant”, but its growth is still quite impressive. I’m just hoping it doesn’t outgrow its space, and touch the top of “The Tank”, like the “inch plant” often will. It’s getting very close to that, so I won’t be surprised if I have to remove some of them.
Another of these terrarium plants that I did buy, was the plant referred to as the, “peacock peperomia”, also known as the peperomia albovittata. This one tends to grow quietly, and I haven’t really noticed it for some time. Inside of, “The Tank”, I placed it in a corner, and it roots and grows with time. Nothing fast, but when you begin to notice something new, it’s spread out just enough for you to ask, “when did this happen?”
Propagating these plants, are just as easy, in this environment, because of the sustained humidity within, “The Tank”. I’ve done so for this one, maybe one time, and I have noticed that it did root quite fast already. Knowing that, it just means that I don’t need to do much in regards to having a separate area for it to grow, unless it becomes crowded. Right now, “The Tank” is becoming very crowded now, with additional plants mentioned in previous journals, so as far as I’m concerned, with these, and any terrariums that I’m using, I won’t really need to buy too many plants going forward.
I’m quite sure there are others, and it will take me some time to identify them, just like I did with the ones in this journal entry. Just know that plants of all varieties takes lots of time and patience to see any true results. Sometimes, the right environments can result in quicker results, and the right tools can aid in quicker, and better results.
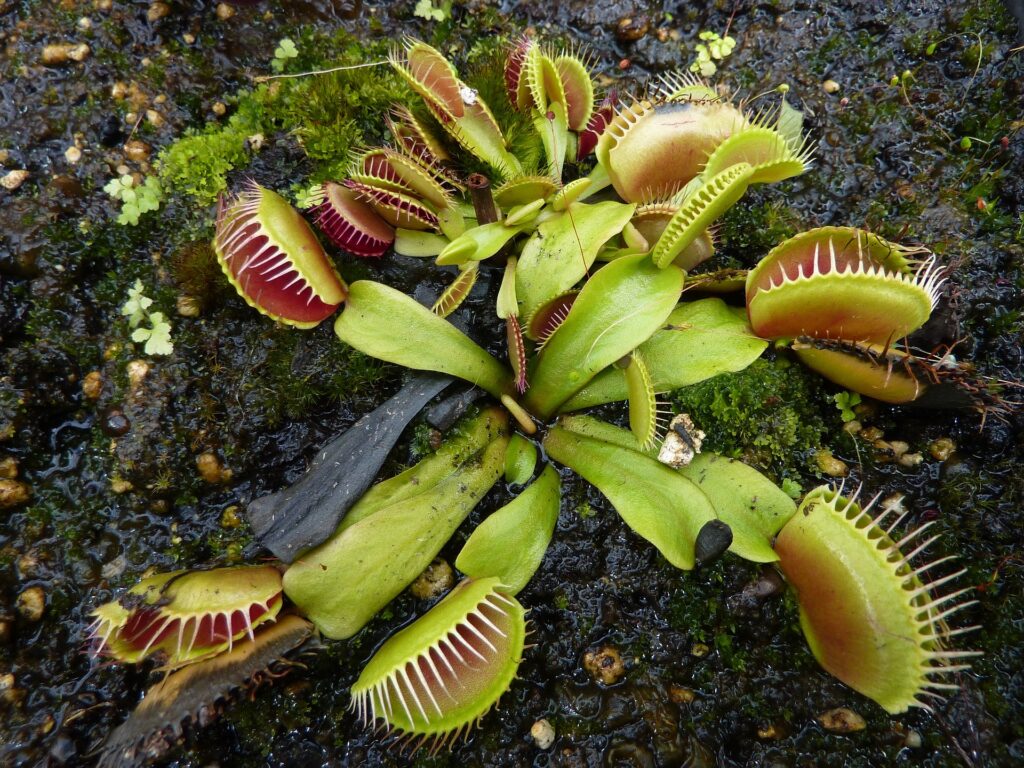
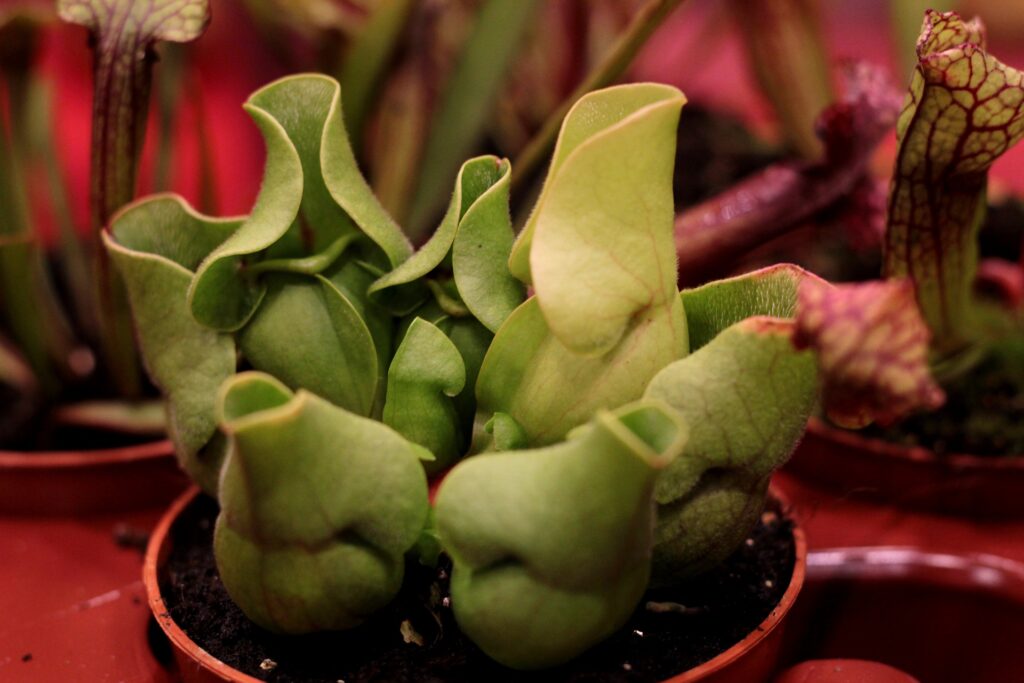
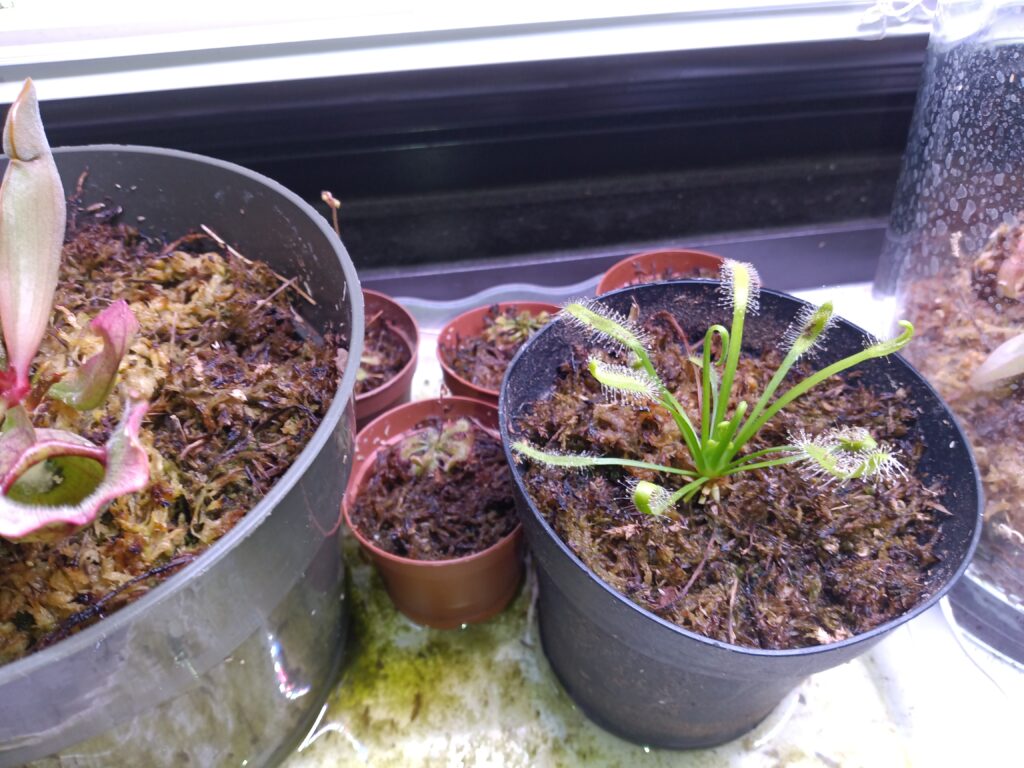
There’s a good variety of plants that I care for, and it’s not easy, but it is fun and a great learning experience. I say this because not all of them can be cared for the same way, outside of sunlight (or grow lights) and water, and even that’s being somewhat general. I have a good set of carnivorous plants, and let’s say, depending on where you get them from, they can be expensive, but if you know how to care for them, it’s a worthwhile investment.
Here’s a list of those that I have, and the difficulties that come with caring for them. For one thing, regular (tap) water is often a no-go for most (if not all) carnivorous plants. Instead, by default, use either distilled water, rain water, or reverse osmosis water.
The most common carnivorous plant that most of us know about is the venus fly trap, and in many cases, it can be not as easy to care for. Why is it tough? It’s not the humidity, generally speaking. It often does have issues of consumption of bugs, and dormancy due to cold weather exposure. Now, venus fly traps, or VFTs for short, can survive without eating bugs, and get good sun and hydration through clean and pure water alone (see previous paragraph). One thing about VFTs, is that they cannot eat too many bugs at once, or it will begin to struggle. This is why you are often recommended to not feed the traps, either with bugs, live, dead or freeze dried, all at once, but rather one or two at a time. The nutrients will increase a spike in growth potential, and lead to new traps surfacing, while the old traps will eventually die out, which is normal.
When it’s not normal, is when all of the traps, start to begin turning yellow, black or brown. That means something is not working right. If it’s yellow, it is leading to the leaf and trap it’s attached to, begin to die or is struggling. When all or most of the traps are shut due to eating bugs, it will be overworked, and some leaves will need to be cut, to reduce the work it’s doing. The ones to cut, should be the ones that are clearly the most yellow, black or brown, so that it relieves the VFT from all that work.
Not long after that, you should start to see some new traps growing. It should be maybe a week or two, before the traps should be fed again (ideally). It’s not always the case, so if you have issues with bugs, keep a close eye on the VFT, so that it does not get overwhelmed, and potentially ends up dying.
What also makes it tough to grow VFTs, is the likelihood of them going into shock, when changing environments. They need to acclimate slowly. When I say slowly, I mean weeks to a month, if you choose to repot; and I’m not referring to first arrival to potting, I’m referring to repotting, from one environment to the next. I mean a closed terrarium setting, to standard potting. The reasons revolve around the humidity changes, which may be too much for the VFT to adjust to, so it needs to go very slow in acclimation. This is true for pretty much all carnivorous plants that have this type of issue, because many are often best in humid or tropical climates, but if they are in a lower or moderate humidity situation, then they can still be okay. The problem comes where it goes back and fourth, usually when it’s from tropical to moderate or lower, it can result in these plants going into shock, and end up perishing as a result.
For most people that have VFTs, it’s often unlikely to have them for longer than a year. I’ve yet to have one to live that long, and I’ve owned overall at least between four and six, maybe more. Currently, I may have three, with one with a bit of rehabilitation, so if that doesn’t work, then the number will be two.
VFTs aren’t first ones I’ve been introduced to. However, I tried to get a few different ones, along with sundews, and nepenthes pitcher plants. I made the effort to get these all at once, but it was in the winter season, where most were supposed to go into dormancy. This didn’t lead them living that long at all.
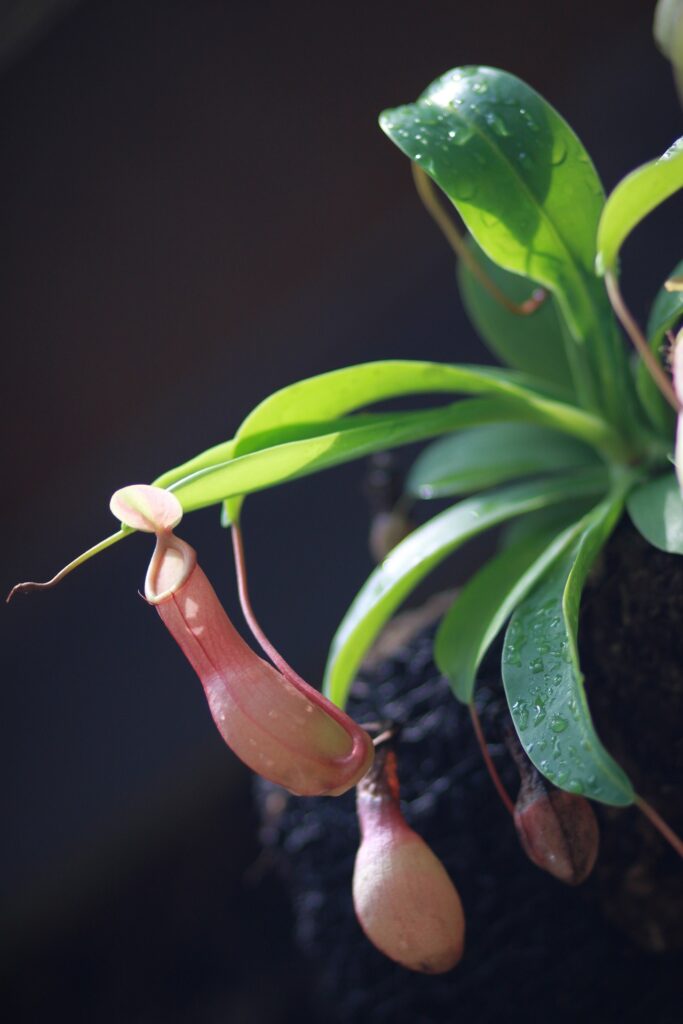
Believe it or not, the nepenthes pitcher plants are the first ones I was able to get. The ones I got first, were the hanging pitchers, with the long basil shoots. Most cases, the pitchers can grow to about two to three inches to full size. There can be smaller traps, but that may be because of something that may be lacking, such as the humidity. More humidity will aid in getting bigger traps, and also feeding the traps will also lead to bigger overall growth of the plants.
These plants can survive without making traps, and I had one particular pitcher plant that stopped making traps for well over a year, and I even propagated some from the original one that I have. Maybe around a year and a half later, some very small traps began to form. Since then I did buy one more, and after a while, I separated the plants, which led to me having two new pitcher plants, along with the ones I have prior to these new ones. I do have a smaller variety of pitcher plant, and since I recently got this one in mid October of 2023, it will be a bit before I can say what will happen. I do know this much. I’ve used sphagnum moss to plant them in, and it’s worked well for most of my carnivorous plants. I have another plant that’s referred to as a pitcher plant, called the sarracenia. These are quite different, and I’ve had at least two, for at least a couple of months. They seem to be growing quite well. Every so often, I will manually feed a freeze dried mealworm to a pitcher, to aid in advancing their growth. They are growing quite well right now, and under a grow light, with some sunlight during the day. The grow light is there to compensate from the changes during the day, whether it’s cloudy, rain, snow, or the transition to shorter sun exposure.
So far so good.
I’ll elude to this in a focused journal about grow lights, but I do know this much, for the sarracenia plants, there is that issue of plants becoming red due to some light stress from the grow light settings, forcing artificially this result. It happens with other plants, and it can be seen as a problem, but not in all cases. I’ll keep a good eye on these plants to see what’s happening.
As far as the sundews, they can be easy to grow, but difficult if you don’t know what you’re doing. I can attest to both instances, because of the amount that I’ve gone through so far. Why do I say this is simple? My experience was to grow them in terrariums, where initially some would grow quite well, even to the point where some would even push flower stalks. Now, I can say this, the timing of purchasing sundews does matter, because there are specific seasons where they decide to push growing flowers. That would be in the summertime. Now, under grow lights, this can happen at anytime, depending on your settings.
I’ve been able to successfully grow as of late, cape sundews, and the spoon-leaved sundews.
The cape sundews seem to be the easiest to grow, and I can attest to this at the moment. All I did was place them in some sphagnum moss, in a small pot, and that’s it. Leave them near a window to get sunlight, with a grow light to make up for shorter daylight, keep them hydrated, and we’re good. Had them for a few months, and I’m seeing them develop dew from the light exposure.
For these I am using grow lights because of the late fall and early to mid winter months, where natural light is less and less. For most plants, it’s required to have somewhere between 12 hours of sunlight or more, for plants to thrive. So, for this picture, they are under grow lights, just as their neighbors are experiencing.
I’ve begun feeding these plants with dried bloodworms, and it turns out these are a good source for food, when these cape sundews cannot catch its own prey. By the way, the type of cape sundews do vary, and the one that most know of, are the variety that turn red and develop dew. The ones I own, are of the white form where it doesn’t turn red, but stays green, with the leaves developing dew, and appears to be white on the leaves. So far, so good.
The spoon-leaved sundews were the ones I got first, and were tough because of me keeping them in a terrarium, but also in keeping them clustered and not separating them. At the time, I didn’t know that they needed to be separated. Every time I received a plant, like a VFT, they would often be single plants, so I went by that as a template. After a while, you figure out, for most plants to survive after you purchase them, you need to separate and then repot them. I didn’t with my first set of spoon-leaved sundews, and they pushed flower stalks, which was the reason that I knew they needed to be separated.
My second set, I separated them, and they’ve been doing quite well ever since. I also kept them in open air pots, and not closed terrarium settings. For some, I have an open air terrarium, and they are growing well. Not only are they pushing flower stalks, but they have enough space to root individually and they also are developing dew and changing from green to red. When the leaves become red, it may also produce dew and be ready to consume prey on its own. Some aren’t turning red, but they are still doing well in their growth, while also producing dew. I’ll still keep an eye out for those that haven’t done this yet, but I do know that many of them have pushed flower stalks, which may slow that dew processing down a bit.
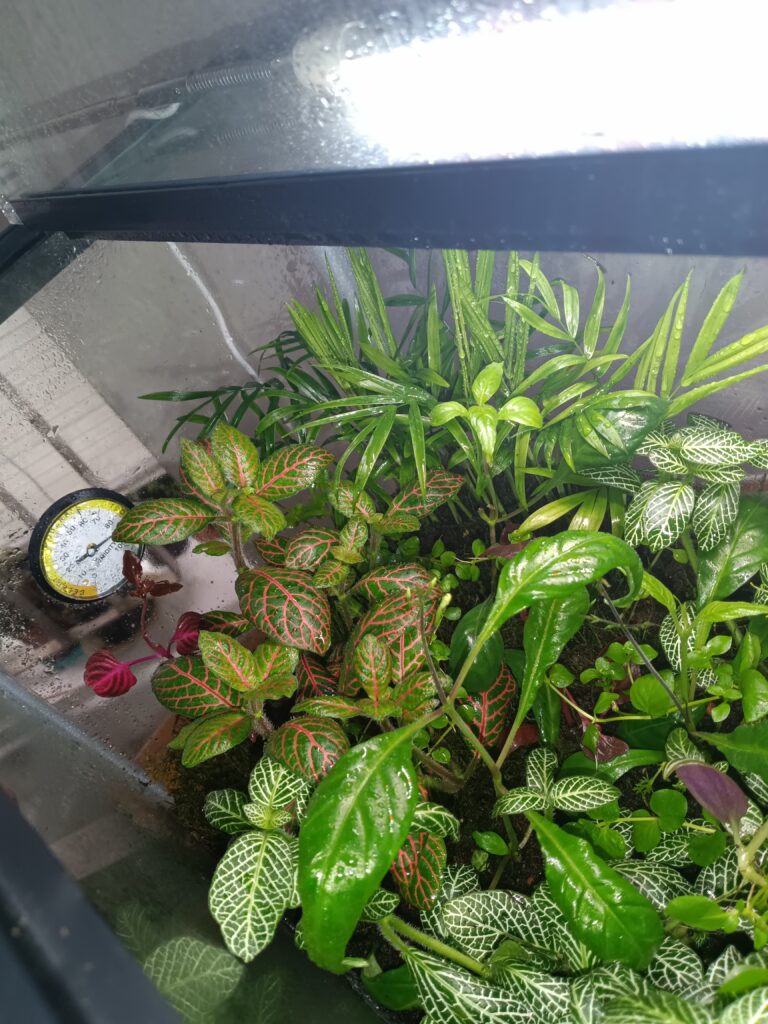
As far as tropical plants go, there are so many, and it will take a long time to get the names of those plants. I can name a few, but often they go the route of thriving in tropical climates. Terrariums, and plants that thrive in tropical climates, are a great combination. One terrarium that I have, I call, “the tank”, is a good area for those tropical plants to grow, and has been for a good year or so. Few plants will be in distress there, because they are getting hydrated through the constant humidity, and enough light from the grow lights. Some of the plants I can name are as follows:
Parlor palms, string of turtles, “baby’s tears”, asparagus ferns, nerve plants (green/red and green/white varieties), “creeping figs” or “creeping Jennys”, and many many others I will identify and name later. Many of them can be acclimated in moderate humidity, and still grow quite well.
There have been a few that grow quite well in, “the tank”, where some will shoot for the stars, with their growth in that environment. When that happens, it leads me to remove them, and repot them in regular pots.
I also have at least one cactus that seems to be okay for the time being. Its needles are still very white and bright, and the flesh of the cactus is bright green. It’s planted in a simple peat moss, and watered weekly, or bi-weekly. It gets a bit of sunlight, so it’s doing quite well for now. Not much else can be said, other than, so far, so good.
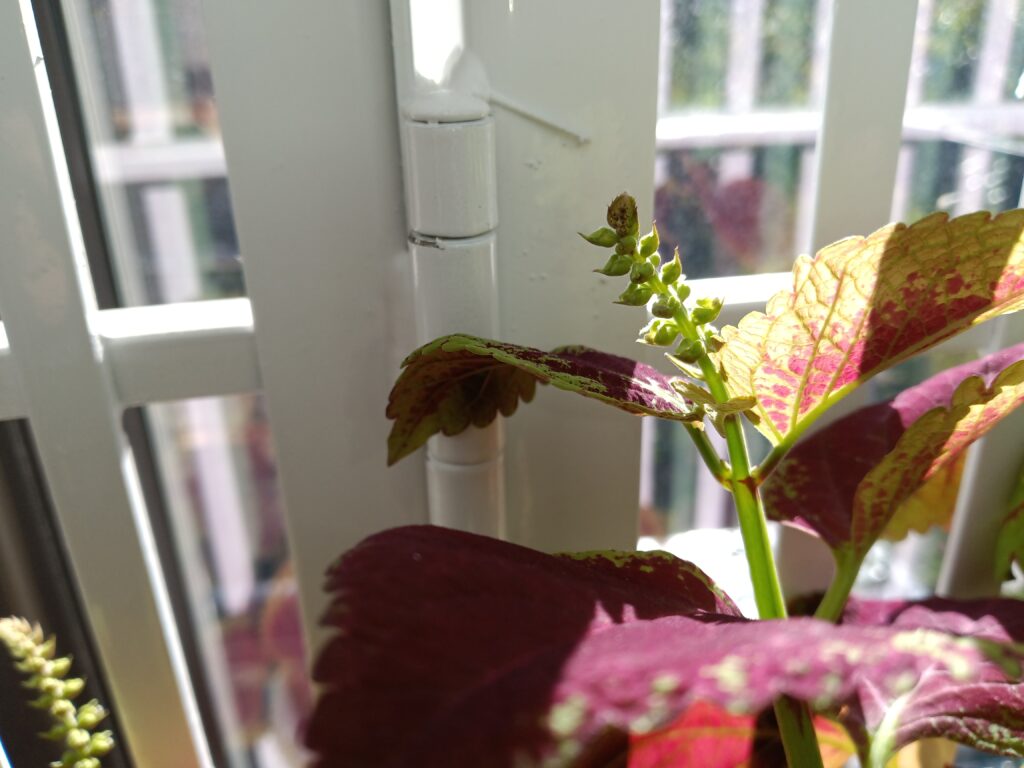
I can say that I’ve had a few coleus plants, both of the green with red veins, and the red with green veins. Each started off small, being in plant pots of a small enough variety to be seen as what I call “starter plants”. This is how I started with these two plants, and I did start them growing in two settings. The greener one, at a dimly lit area, light only from a west facing window, and not much to be fair. The redder one, at the south facing window, with plenty of sunlight. The redder one grew fast, where the greener one was somewhat stagnant. So, I made a change for the greener one, and brought it to the window similarly to the redder one. It began to grow just as fast, if not faster.
Eventually I went to transfer those to bigger pots. Then, I propagated a few from both varieties of coleus, and it led me to moving them to bigger window planters, to hold several coleus plants. Many of them since has become bushy, and some are even starting to push flowers. It’s fun to watch this, and to see how easy it was to grow them to this point. From first purchase to the flowering stage, it took maybe six months or less.
When it grows so much, it takes a lot to water them. I’ve upgraded in spraying them with a simple trigger plant sprayer, to a pump sprayer, with a high enough capacity, to cover the entire set of plants. I do this for both window planters.
I have to add this one last, and that’s the variety of moss. First should be sphagnum moss, while the other will be sheet moss that I purchased locally. The one thing about moss, is that it can dry out, but also once it’s rehydrated, it can live and even aid in being helpful to the plants they are paired with, especially when it comes to hydration. I don’t know why this is, but it’s quite helpful so see it for yourself.
Often, moss is used as a decorative addition to many other plants, especially in terrarium settings. They can be used outside of them, however, depending on the imagination of the owner, you can do quite a bit with the moss.
Many can simply pick up wild moss from nearby outdoor settings, but if that’s not available, you can find and purchase them. I got a good set, for about $10 to $15, and it wasn’t even the entirety. Some stay dry, and most of it will, because they can be a bit much, so leaving them to be dry, will be fine. You can awaken them leaving them to soak in water for a while, but leaving it in various light settings will result in lighter, and pale colored moss, or darker green colored moss.
I’ve yet to make a separate moss display, with a small, fluffy moss in a pot, which is what some specialists often do. Maybe that’ll happen later.
I have to add to this sphagnum moss, because it’s dried, but not dead, and it’s used for a variety of uses, but mostly for a different option to soil. The long fibered variety, is dried enough so that it won’t (immediately) begin to growing and sprouting new growth. That can still happen, but it takes a long time, and with the right conditions.
I’ve had some proof that this can happen, but it takes a long time. If it’s completely enclosed, no air, you’ll develop not just shoots of green leaves, but also sprouts and algae. To avoid the algae, you may need to get some springtails or other insects that will consume the algae. Since I don’t have them, I need to do something slightly different.
I’ve chosen to do this in a different container, with some fresh sphagnum moss, in hopes of getting this result, without the algae. As time progresses, I’ll update this in the next journal. This list may grow over time, and with other follow-up journals, I’ll detail what those are, along with the plants I couldn’t identify at this time.
For me, I’ve seen more successes and failures in this scenario, but to be fair, it’s the best trial-and-error scenarios for some plant lovers and hobbyists. It shows creativity, and also aids in seeing something very different in how some plants thrive in a closed environment. There are a variety of terrariums that I’ve used where I’ve had a variety of results. I’ve used many different types of plants, and many of these plants would be seen as either tropical or are boosted in tropical environments.
Closed terrariums can create tropical environments. Many go the route of putting not just soil and plants in them; those happen in the end. Preparing them, it’s a bit more detailed. This is the case for both open terrariums and closed terrariums. I’m dealing with both. With the open terrariums, expect to have things be room temperature all the way.
Depending on how wide the top of each terrarium will be, the less likely any humidity would remain in it. Let’s say it has a narrow top, maybe an inch or two in diameter, it may take a bit longer for the humidity to reduce, and evaporate on through that small opening. With that opening, air will get in so those plants will get some slightly drier air. If it’s wide, then there won’t really be any humidity on a large scale, it will be short-lived at best, and whatever the atmosphere in the environment happens to be, then you will see the terrarium and the plants within acclimate to that environment.
Terrariums with wide tops, are quite similar to most planters, but with false bottoms. I’ll explain this in a bit. In general, terrariums are often put together, with false bottoms. It may not be the case for all, but for many that I’ve seen online, and what I’ve put together myself, this is the case.
When looking at these false bottoms, it’s a way of creating that layer where plants will not find themselves having their roots growing out of control. It’s also a way for better drainage of excess water. With terrariums, if it’s warm enough, that water that drains at the bottom, can and will evaporate, rather than stay sitting in that area.
Many false bottoms are made with pebbles, or small rocks, and this can help with allowing the water to sink below the layer of soil that’s used. Some people use perlite for false bottoms, which can be a problem because it’s so light. In my opinion, perlite is best used, when mixed with other mediums like peat moss.
With covered terrariums, the idea of false bottoms are often used, and only so much water is used for them. This way, that water can go through that phase of slowly evaporating, but that water cycles itself, back to the top, and back to the bottom, keeping the plants and soil hydrated for longer periods. This way, the need to water them frequently won’t be necessary.
It may be optional, but for some people who swear by this, the use of springtails is key to aid in giving the plants what it needs in closed terrariums. Why? Springtails can feed on mold and algae that develops in the terrarium. In return, they produce the CO2 that benefits the plants in the terrarium.
For those that don’t use them, they can go about opening their terrariums, to air them out a few times a month, maybe once a week or every two weeks. I do this to prevent mold and algae from building up.
I have some small to moderate sized terrariums, where I have some with false bottoms, much like I described earlier, with some viney plants like “baby’s tears”, “creeping figs” or “creeping jennys” (maybe), nerve plants aka fittonia, and for some, I also have maybe a few pieces of lava rock, that took some time to break up into smaller pieces (that’s for another journal). For soil, it may vary, but it’s primarily peat moss.
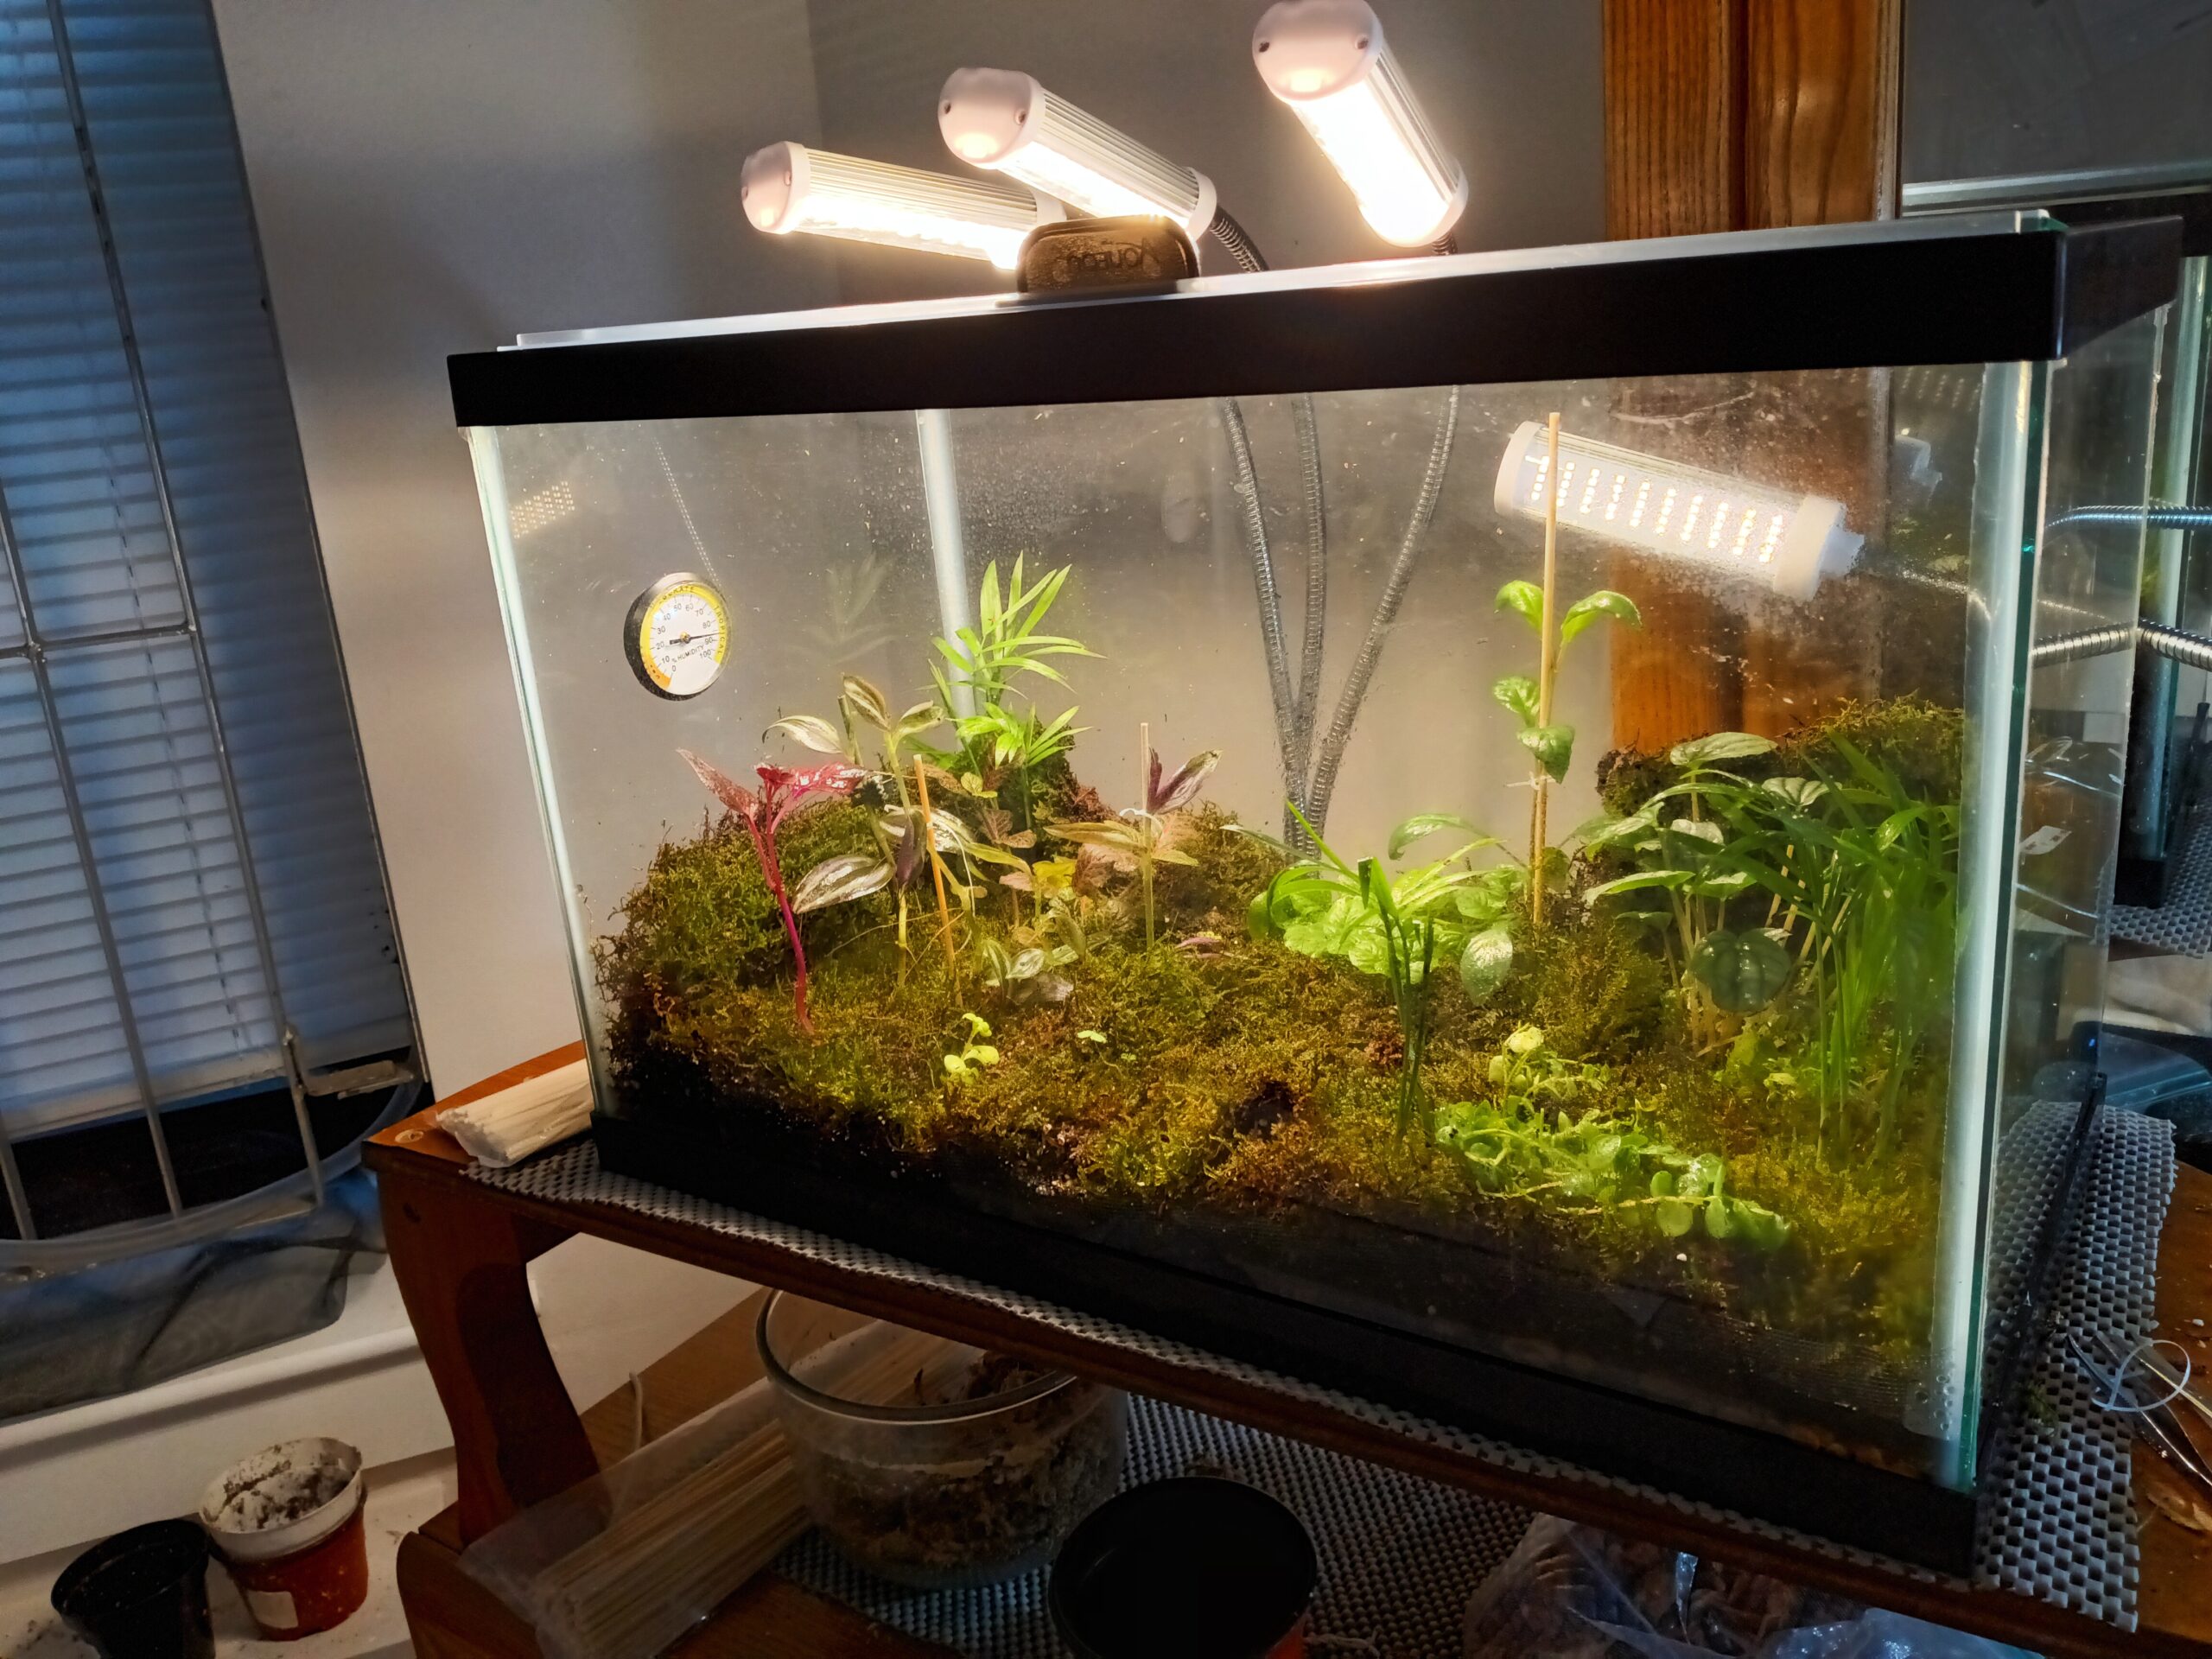
For my biggest terrarium, “the tank”, which is a 10-gallon fish tank, used for this purpose instead of having aquarium. This one took lots of trial-and-error, but after some time, I think I got it right.
When it comes to, “the tank”, it’s literally like a mini-jungle under glass. What it took to make this work, took lots of trial-and-error. First attempt, will be discuss in a bit. That involved the many carnivorous plants that I had in the beginning. Now, I will say that I made an error, which resulted in a few of them not lasting for very long, including my favorite one, the red dragon, but it was a learning experience all the same.
For that time, I did go the route of using standard peat moss and perlite mix, or just peat moss, to have the plants grow in that tank, while still potted. Eventually, I began to see some of them grow, and my red dragon did produce a flower stalk, which I initially thought it was a good thing. It may have been from stress, but it continued to grow for a while, and produce a few traps here and again. The nepenthes x lady luck did okay for a while, but wasn’t too fond of the settings after a while. Eventually it stopped producing traps, and eventually didn’t survive. The standard small venus fly trap, grew a bit, but it didn’t grow for very long. So, as far as the tank is concerned, it’s hit and miss with the carnivorous plants inside “the tank”.
I tried re-acclimating the red dragon outside of the tank, but it went into shock, shriveled up, and that was the end.
The second attempt was very different. This is when I went with that false bottom, but with perlite, about maybe half an inch. I covered that layer with a plastic wire mesh, to keep the layer of soil used separate from the perlite. I used about an inch peat moss for this, and all of what I did worked. I had some sphagnum moss in there to cover some of the plants that were in there. I would water, every now and again, along with spraying, to keep whatever plants I had in there happy and hydrated. Now, add to this, something to cover “the tank” with a cover, and that cover would have plastic wrap taped to the cover. This kept the humidity contained for a bit longer.
I had the idea of giving “the tank” some extra humidity, so I fixed up a small humidifier to push the mist into “the tank”, to boost the moisture and humidity for those plants. Things were great for a while, until I began to notice the water was building up, to the point where things got more and more difficult to maintain. What do I mean? Well, the perlite, that was at the bottom of “the tank”, came to the surface, and was floating atop of the little pond that developed, as a result of the water levels rising from using the humidifier.
I added some plants like the “lucky bamboo”, and some extra rocks for the sake of holding them in place. I broke it into three pieces, and one I didn’t place in there. One made it, and I had it propped up with small stones made for fish tanks. Things were just too cluttered, with the sphagnum moss, the perlite, and the excess water, I chose to do something different.
Eventually, changes needed to be made. So, I emptied “the tank” and tried something different.
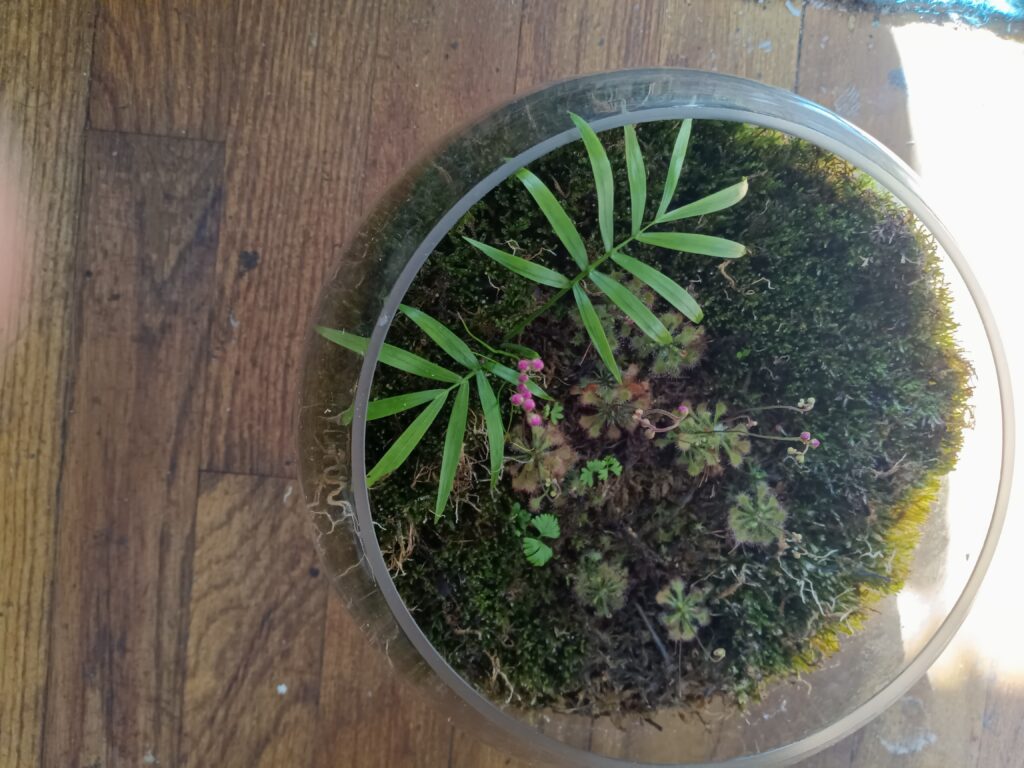
I emptied “the tank”, then started over. I used fish tank pebbles, for the drainage layer, and went the route of using enough for about half an inch. Just like before, I used plastic wire mesh to separate the soil, which I used a tropical mix, which has more pieces of lava rock in them. I filled it to about two inches. Afterwards, I tried something else. I used some sheet moss to cover the background, giving it that optimal green look that you would see with most outdoor plants.
I added some plants I recently bought, one was a parlor palm, another was what’s called either a bloodleaf or a “Juba’s bush”, and the other main one, maybe it’s called a “watermelon peperomia”. I also added some small lava rocks, made specifically for fish tanks. Because I layered the sheet moss throughout “the tank”, I put them in the middle to cover up a plant where it could root and grow better. I can’t identify that particular plant, but what I can say from its origin, is that it was growing out of a nepenthes x lady luck that didn’t quite make it in my first attempt with “the tank”. I grew that in the smaller closed terrariums for a while, and it grew quite big, but after it outgrew that terrarium, I brought it over to the tank, where it’s growing well to this day.
Unfortunately, with the lava rocks, because they sat on top of the sheet moss, the moss began to suffocate, and develop a bad smell, so I had to remove those rocks. Also, when doing that, I had to prop up that same little plant, which got taller, with bamboo skewers and some dental floss. I eventually did this with other plants that grew tall, but leaned a lot to the sides. When removing the stones, the plant developed roots that hooked onto the rock, creating a different kind of problem.
I eventually added more plants, like the “creeping Jenny”, and “string of turtles”, but I also removed a good set of the sheet moss. I removed the sheet moss, because in large amounts, it develops a smell, once it sets on top of the dampened soil. I found this out with other terrariums. So, instead of using the large patches of moss, I’ll use small patches, or trim off the top, and layer that in “the tank”, for where I didn’t have any plants just yet. Things got better since then, and to monitor the humidity, which I did when I started this project, I added a humidity gauge to “the tank”. This way, I can monitor the humidity properly.
After some time, the plants rooted, and grew quite fast. Some a bit slower than the rest, but they grew. Most of them over time, developed air roots, because the humidity was so high. There was one plant, where it grew so fast, that I had to cut them in half, and propagate them much quicker than the others. Eventually, it grows so fast, that it literally touches the tank cover. This led to me not propagating anymore, but rather removing them, and rooting them into peat moss for small plant pots. I’ve done this with a few of them, with some propagations still in “the tank”.
There were other plants that I added, such as nerve plants, and for one set, the green/white one, that not only thrived with continued growth and fast rooting, but it also emitted an interesting scent. It was more like a minty scent, but for a while it had me worried. It turns out it was very happy, and either the smell subsided, or I simply got used to it, and didn’t notice it after a while.
For many of the plants, if I can help it, and actually have room, I can use “the tank” to grow them, and then bring them out and place them into plant pots, because they are content as long as they get the essentials.
Speaking of essentials, since this is a fish tank, I can’t position it near a window, so grow lights are a must. This benefits from having grow lights, are to mimic what plants receive from sunlight. For “the tank”, I had a three-neck grow light, actually I have two of them, both powered through USB connections. I set the timer for both, but one of them burned out the adapter. This grow light helped the plants in “the tank” grow with the needed essentials that I can’t provide otherwise.
So, as far as the environment for those plants, this worked out, and continues to work out. No need for springtails or anything to prevent mold or algae. I just air it out every now and again. “The tank” is my biggest and best terrarium, because it helps the plants in there thrive, and some of them even began to push flowers. I haven’t really seen this take place with the other plants in other terrariums, aside from the open terrarium, with several spoon leaf sundews pushing flower stalks already. That’s a result of the grow light, and its programmable settings to make this happen.
Just like with most indoor settings, grow lights are a must, and that will be explained in another journal.
In conclusion, for now, terrariums can be good, for those that may want to put something together, and then leave it alone. Now, when I say leave it alone, I don’t mean neglect it. Every now and again, look to it maybe later in the week, maybe two days or more, to see any progress. If there are problems, you can take a few minutes to adjust, maybe longer if it’s vital. However, just like with plants outside of these settings, they need maintenance, and occasional hydration. This will be more of a controlled environment for many of these plants inside terrariums to thrive, even for a little while. Fertilizer, not needed either.